The portable freedom of a Bluetooth speaker is its greatest asset, but nothing cuts that freedom short like a dying battery. If your once-lively speaker now struggles to hold a charge or powers down unexpectedly, you’re not alone. Battery degradation is a natural process, and for many, replacing the internal battery can breathe new life into a beloved device, saving money and reducing electronic waste. This comprehensive guide will walk you through everything you need to know about replacing your Bluetooth speaker’s battery, transforming it from a fading relic back into your go-to sound companion.
Understanding Your Bluetooth Speaker Battery
Before diving into the replacement process, it’s helpful to understand the heart of your speaker’s portability: its battery. Most modern Bluetooth speakers utilize lithium-ion (Li-ion) batteries, known for their high energy density and rechargeable capabilities. Some larger, older, or more powerful portable speakers, particularly those from brands like ION, might use sealed lead-acid batteries.
Batteries naturally degrade over time, primarily due to charging cycles and age. Each time you charge and discharge a Li-ion battery, its maximum capacity slightly diminishes.
Signs Your Battery Needs Replacement:
- Significantly reduced play time: The most obvious indicator is that your speaker doesn’t last as long on a full charge as it used to.
- Failure to hold a charge: The speaker quickly drains even after being fully charged, or struggles to charge at all.
- Unexpected shutdowns: Your speaker turns off randomly, especially at higher volumes, even when it indicates some charge remaining.
- Physical swelling: A bulging battery is a serious safety hazard and requires immediate attention and replacement.
Is DIY Battery Replacement Right For You?
Replacing a Bluetooth speaker battery can be a rewarding project, but it’s not for everyone. It requires a certain level of comfort with small electronics and basic tools.
Pros of DIY Replacement:
- Cost-effective: A new battery is often significantly cheaper than a brand-new speaker.
- Environmentally friendly: Extends the life of your device, reducing electronic waste.
- Satisfaction: The pride of repairing something yourself.
Cons to Consider:
- Technical skill required: Some speakers involve soldering or intricate disassembly.
- Risk of damage: Improper handling can damage the speaker or the new battery.
- Safety concerns: Lithium-ion batteries can be volatile if mishandled.
- Voiding warranty: Opening your speaker will almost certainly void any existing warranty.
If you’re unsure, or if your speaker is particularly complex or expensive, consider seeking professional help. However, for many common models, DIY replacement is straightforward.
Gathering Your Tools and Supplies
Having the right tools is crucial for a smooth and successful battery replacement. You’ll want to ensure you have everything on hand before you begin.
Essential Tools:
- Small Phillips and Flathead Screwdrivers: For opening cases and internal components.
- Plastic Prying Tools (Spudgers): Useful for gently separating speaker housings without scratching.
- Soldering Iron and Solder (Optional but common): Many internal batteries are soldered directly to the circuit board. If yours is, you’ll need these.
- Wire Strippers: If you need to cut and re-strip wires.
- Heat Shrink Tubing and Heat Gun/Lighter (Optional): For insulating soldered connections.
- Multimeter: To check battery voltage and verify polarity.
- Safety Glasses: Protect your eyes from solder splatter or flying debris.
- Tweezers or Precision Pliers: For handling small wires and components.
- New Replacement Battery: This is the most critical component.
Choosing the Right Replacement Battery:
Selecting the correct battery is paramount. You need one that matches the original’s specifications as closely as possible, especially concerning:
- Voltage (V): Must match the original battery. This is non-negotiable.
- Capacity (mAh or Wh): The higher the mAh (milliampere-hour) or Wh (watt-hour), the longer the battery life. You can often choose a higher capacity than the original, provided it physically fits and doesn’t exceed the speaker’s charging circuit limits.
- Physical Size and Shape: Crucial for fitting into the battery compartment.
- Connector Type (if applicable): Some batteries have specific connectors; others are direct-solder. If your original has a connector, try to find a replacement with the same one, or be prepared to transfer the connector or solder directly.
- Type: Ensure it’s the correct chemistry (e.g., Li-ion 18650, Li-Po pack).
Always check the original battery’s labels for voltage and capacity. When in doubt, research your specific speaker model online for compatible battery information.
Step-by-Step Guide: Replacing Your Bluetooth Speaker Battery
This section provides a general guide. Specific steps may vary depending on your speaker model. Proceed with caution and refer to any model-specific guides if available.
1. Preparation and Safety
- Power Down: Completely turn off your Bluetooth speaker and disconnect it from any power sources.
- Clear Workspace: Set up a clean, well-lit workspace with enough room for tools and components. Place a soft cloth or mat down to protect your speaker from scratches.
- Safety First: Wear safety glasses, especially if soldering. Have good ventilation.
|
Our Picks for the Best Bluetooth speaker in 2026
As an Amazon Associate I earn from qualifying purchases.
|
||
| Num | Product | Action |
|---|---|---|
| 1 | Portable Bluetooth Speaker, IPX7 Waterproof Wireless Speaker with 20W Loud Stereo Sound, 15H Playtime & Beat-Synced RGB Light, Small Outdoor Speaker for Shower, Pool, Beach, Hiking and Gifts |

|
| 2 | JBL Charge 6 - Portable Waterproof & Drop-Proof Bluetooth Speaker, Bold JBL Pro Sound with AI Sound Boost, 28Hrs of Playtime, Built-in powerbank & Comes with a Sturdy/Removable Carrying Strap (Black) |
|
| 3 | JBL Go 3 - Portable Mini Bluetooth Speaker, big audio and punchy bass, IP67 waterproof and dustproof, 5 hours of playtime, speaker for home, outdoor and travel (Black) |
|
| 4 | Monster S620 Bluetooth Speaker, Wireless Portable Outdoor Bluetooth Speakers, 60W True Wireless Stereo IPX8 Waterproof, Dual PairingBluetooth 5.4 Built-in Mic, Perfect for Home, Blue |
|
| 5 | Bose SoundLink Flex Bluetooth Speaker (2nd Gen) - Portable Outdoor Speaker with Hi-Fi Audio, Waterproof and Dustproof, USB-C, Up to 12 Hours Battery Life, Twilight Blue - Limited Edition Color |
|
| 6 | JBL FLIP 5, Waterproof Portable Bluetooth Speaker, Black, Small |
|
| 7 | JBL Go 4 - Ultra-Portable, Waterproof and Dustproof Bluetooth Speaker, Big JBL Pro Sound with Punchy bass, 7-Hour Built-in Battery, Made in Part with Recycled Materials (Blue) |
|
| 8 | BolaButty Bluetooth Speaker with HD Sound, Portable Wireless, IPX5 Waterproof, Up to 20H Playtime, TWS Pairing, BT5.3, for Home/Party/Outdoor/Beach, Electronic Gadgets, Birthday Gift (Black) |
|
| 9 | Soundcore Boom 2 By Anker, Outdoor Speaker, 80W, Subwoofer, BassUp 2.0, 24H Playtime, IPX7 Waterproof, Floatable, RGB Lights, USB-C, Custom EQ, Bluetooth 5.3, Portable for Camping and Beach - Black |
|
| 10 | Anker Soundcore 2 Portable Bluetooth Speaker, 12W Stereo Sound with Deep Bass, IPX7 Waterproof, 24-Hour Playtime, Built-in Mic, for Home, Outdoors & Travel |
|
2. Disassembly: Accessing the Battery
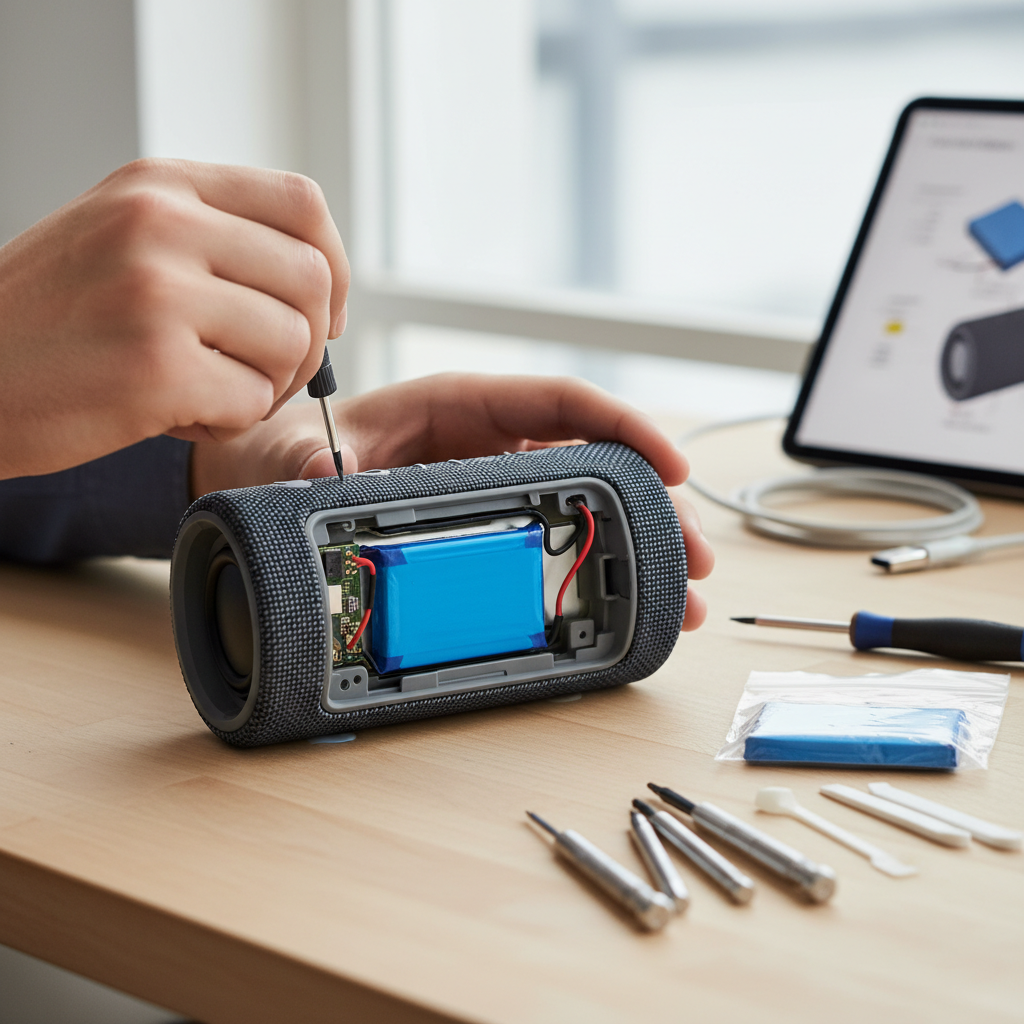
- Locate Access Points: Examine your speaker for screws, clips, or seams. Battery compartments are often on the bottom, back, or side. Some speakers hide screws under rubber feet or anti-slip mats. You might need to gently pry off a grille or a decorative panel.
- Unscrew and Open: Use the appropriate screwdriver to remove all visible screws. If there are no screws, carefully use plastic prying tools to gently separate the casing along the seams. Work slowly to avoid breaking plastic tabs. Keep track of all screws and parts, perhaps in a compartmentalized container.
- Internal View: Once open, identify the battery. It’s usually a rectangular pack, often wrapped in plastic or tape.
3. Old Battery Removal
- Identify Connections: Observe how the battery is connected. It will typically have two wires (red for positive, black or blue for negative) leading to a connector or directly soldered to the circuit board.
- Disconnect or Desolder:
- If Connected via a Plug: Gently pull the connector to disconnect the battery from the circuit board. Avoid pulling the wires themselves.
- If Soldered: This requires more care. Note which wire goes to which pad (positive/negative). Heat one solder point with your soldering iron until the solder melts, then gently pull the wire away. Repeat for the other wire. Be quick to avoid overheating the circuit board.
- Remove Battery: Carefully lift the old battery out of its compartment. It may be secured with double-sided tape or a bracket.
- Proper Disposal: Dispose of the old battery responsibly. Lithium-ion batteries should not be thrown in regular trash; take them to an electronics recycling facility.
4. New Battery Installation
- Prepare New Battery: If your new battery came with bare wires, you might need to strip a small amount of insulation from the ends. If it came with a different connector, you might need to carefully transfer the original connector (if reusable) or splice and solder the new battery’s wires to the old connector’s wires, ensuring correct polarity.
- Connect/Solder New Battery:
- If Using a Plug: Connect the new battery’s plug into the corresponding port on the circuit board, ensuring correct orientation.
- If Soldering: Carefully solder the new battery’s wires to the correct pads on the circuit board, matching positive to positive (usually red wire) and negative to negative (usually black/blue wire). Double-check polarity with a multimeter before soldering if you are unsure. Insulate any exposed solder joints with heat shrink tubing or electrical tape.
- Secure Battery: Place the new battery securely in its compartment. You may use new double-sided tape if the original adhesive was lost. Ensure wires are neatly tucked away and not pinched.
5. Reassembly
- Connect Any Loose Components: Reconnect any internal cables or components that may have been disconnected during disassembly.
- Close Casing: Carefully align the speaker’s casing halves. Ensure no wires are pinched. Gently press the halves together.
- Re-insert Screws: Put all the screws back into their respective holes and tighten them. Do not overtighten, as this can strip the plastic. Reattach any grilles or anti-slip mats.
6. Testing and Initial Charge
- Initial Test: Once reassembled, try to power on the speaker. If it turns on, congratulations!
- Full Charge: Connect the speaker to its charger and allow it to charge fully. It’s often recommended to perform a full charge and discharge cycle for optimal new battery calibration.
- Functionality Test: Play some music to ensure everything is working correctly.
Troubleshooting Common Issues
Even with careful execution, issues can arise. Here are a few common problems and their potential solutions:
- Speaker Not Turning On:
- Check all connections, especially the battery connector or solder points, for proper contact and polarity.
- Ensure the battery is charged. Try plugging it into power for a while.
- Verify the new battery’s voltage matches the original.
- New Battery Not Charging:
- Double-check polarity. Reverse polarity can prevent charging or even damage the battery/speaker.
- Ensure the charging port and internal charging circuit were not damaged during disassembly.
- Confirm the battery is correctly seated and its connections are secure.
- Speaker Sounds Distorted or Has No Sound:
- This is less likely to be battery-related, but recheck any speaker driver connections or other internal cables you might have disturbed.
- Ensure the casing is properly closed and not putting pressure on internal components.
Extending Your Bluetooth Speaker Battery Life
Once you’ve successfully replaced your battery, adopting good habits can help prolong its lifespan.
- Avoid Extreme Temperatures: Don’t leave your speaker in direct sunlight, hot cars, or very cold environments.
- Partial Charging: For lithium-ion batteries, it’s generally better to keep them between 20% and 80% charge rather than constantly charging to 100% or letting them fully deplete.
- Store at Moderate Charge: If storing the speaker for a long period, charge it to about 50-60% before putting it away.
- Use Original Charger: Whenever possible, use the charger that came with your speaker, or a reputable replacement with matching specifications.
“A well-maintained lithium-ion battery can last for hundreds of charge cycles, but proper care is just as important as the quality of the battery itself.” – Dr. Elena Petrova, Lead Battery Chemist
Conclusion
Replacing the battery in your Bluetooth speaker is a tangible way to extend its utility and reduce electronic waste. While it requires a bit of patience and some basic tools, the satisfaction of restoring your speaker to its former glory is immense. By carefully following these steps, you can enjoy many more hours of uninterrupted music, podcasts, or calls. So, ready to take on the challenge and give your favorite portable audio device a new lease on life?